Good Afternoon Everyone,
I got a lot of comments and questions about this card so I thought I would put a tutorial together for you. Enjoy.


I got a lot of comments and questions about this card so I thought I would put a tutorial together for you. Enjoy.
Envelope Card
By: Debbie Moran
Supplies:
Legal size
envelope (ones with a flat tab works best)
Card Stock
Adhesive
Coloring tools
Ink
Paper cutter
Pen
Ruler
Designer Paper

Step One:
Draw a line
on the flap fold of your envelope using your ruler and pen. This will help you see better when you need to
cut it.

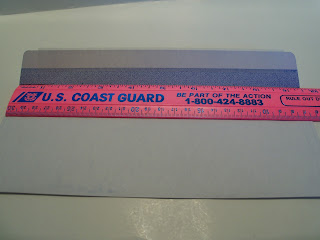
Step Two:
Take your
ruler and mark dots at 2 ¼ and 7 ¼.

Step Three:
Put Envelope
in cutter and cut along envelope fold to your marks. Then cut off the rest of
the flap.

Step Four:
Fold the
bottom part of your envelope toward the center. The ends will not meet in the
center.

Step Five:
Stamp
background images onto the flaps and back of envelope, but not on the inside of
the flaps.


Step Six:
Cut your base card stock 4 ½ x 4. Layer to your
liking.

Step Seven:
Tear bottoms
of the two card stock. Do not tear the DP. Mount all three pieces together.

Step Eight:
Stamp and
color your image onto white card stock and adhere to your layered base.

Step Nine:
Adhere your
base to the flap of your envelope.

Step Ten (optional):
Stamp a
sentiment on the inside of the flaps.

Step Eleven:
Cut from
your layered cardstock 1 piece of 4 ¼, one 3 ¾ and one pice of white 3 ¾ x10/8.
This will make the inside of your card. Mount all the pieces together.

Step Twelve:
Stamp
sentiment or image on insert and color. Finish card to liking.


I hope you enjoyed my tutorial today, this is a very simple and easy card to do and different from others. Thanks for stopping and commenting. I hope to see you again soon. Have a blessed day.
Thanks
2 comments:
This is really neat and so pretty. The colors are fabulous, too! Thanks for playing along with us Debbie and good luck!
This is a very interesting technique, thanks for sharing the details. Love your beautiful flowers - great coloring. Thanks for playing along at DRS Designs.
Post a Comment